How to Build a Deck - Deck Building Basics
Deck building can be quite a demanding job if you don’t have prior experience. However, with proper guidance and the ClickDeck system, you can build a beautiful, high-quality deck that can stand the test of time.
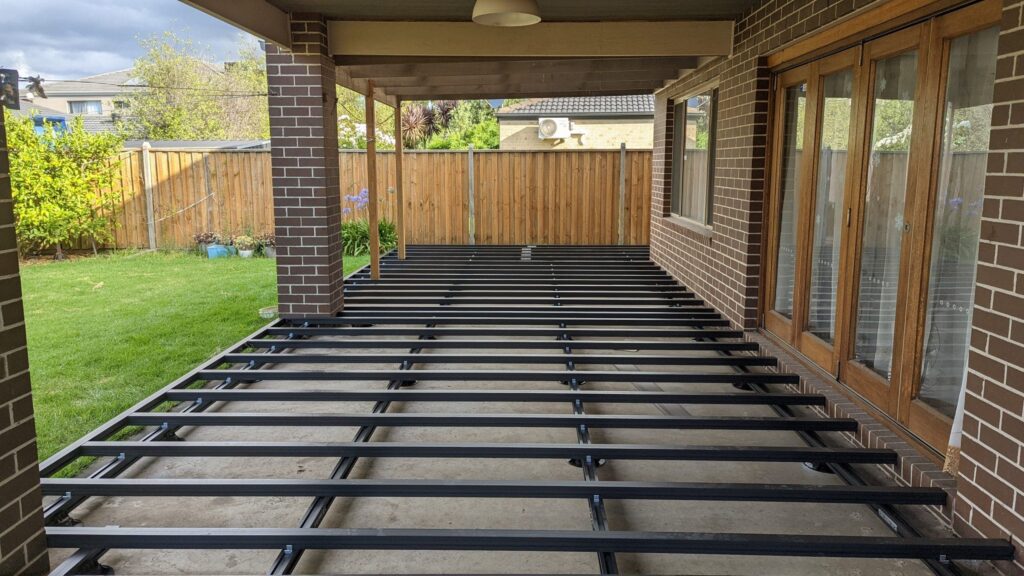
To help you out, we’re going to go through how to build a deck using ClickDeck’s aluminium modular decking system. This subfloor system features easy-to-install components as well as various adjustable features. The modular design not only makes the installation process more manageable, but it also makes your deck more adaptable to different environments and aesthetic designs.
Required Components
Here’s what you need:
- Pedestals/Steel Deck Supports
- Bearers
- Joists
- Perimeter Joists
- Corner Brackets
- Joiners
- Hold Down Clips
For an extended list and a more in-depth look at each of these components, please have a look at our comprehensive design guide. But, here are the basics.
Deck Building Guide
- Determine Your Floor Height
Determine the floor height for your deck. You can do this by measuring the combined height of the joist, bearer and deckboard. Once you’ve determined the floor level, you need to set your pedestals at the right height. ClickDeck’s foundation system can also be supported by steel or timber posts.
- Installing The Bearers
Lay the bearers on top of the pedestals in the same direction as your deckboards. All bearers must be laid out with the flat side up.
Once you’ve determined the placement of the bearers, secure each one to the pedestals with two screws, ensuring that everything is spaced out properly.
- Adjust the Height if Necessary
Take a moment to check if the height of the foundation is correct. With ClickDeck’s system, you can twist each individual pedestal to adjust the height accordingly.
- Secure Joists to Bearers
Mark out the placements of each joist on the bearers, making sure that the spacing is consistent. Typical spacing should be around 450mm. Joists should be laid perpendicular to the bearers and deckboard. For decking, the joists should have the flat side up.
Use hold down clips to secure each joist to the bearers. The clips should be installed on alternating sides of the joist.
Some foundations use a joist-only layout. In this case, you need to use corner brackets to secure each joist to the perimeter joist. Please see the design guide for more information and a visual aid.
- Install Corner Brackets
Install corner brackets to further secure the joists to the foundation. These brackets should be used to secure the following joints:
- Joist to perimeter joist
- Joist to integrated bearers
- Vertical joins
- Various angled connections
If you’re attaching the deck to a structural wall, make sure each joist has a two-bracket connection to the wall. Additionally, if you’re going to install a fascia board, make sure the supports have the proper corner brackets for stability.
- Installing Decking Material
Install your deckboards. The ClickDeck system is compatible with all composite decking, timber decking and various eco-friendly decking options as well. This includes plastic decking, Ekodeck, ModWood decking, NewTechWood decking, Woodevo decking, Trex decking, Merbau deck, and many more…
If you have composite decking, you should be able to install the boards with hidden T-clips. For hardwood, you will typically need stainless steel metal drilling screws. With the exception of screws with steel wings, all types of self-drilling screws should be compatible with our system.
Find Out More
This simple guide should be able to get you started on your deck building project. For more information, make sure to refer to our instructional diagrams page.
We also recommend that you directly contact the experts at ClickDeck if you’re unsure about anything regarding deck installation or design ideas.
If you want to get an idea of how much your DIY deck is going to cost, you can get an instant quote through our deck builder calculator. Alternatively, you can also send us an enquiry via our online contact form.